
TimecodeMate3 User Manual
TimecodeMate3 is a timecode editor for REAPER with two-way synchronization with grandMA3. Build Timecodes, Tracks, Events, Sequences and Cues in REAPER or in grandMA3, then exchange the changes with Update, which you always start from the grandMA3 plug-in.
Save the REAPER project and the grandMA3 show before the first Update. REAPER Undo reverses REAPER edits; it cannot undo a write to the console.
Contents
What's new in Release 5
Main changes
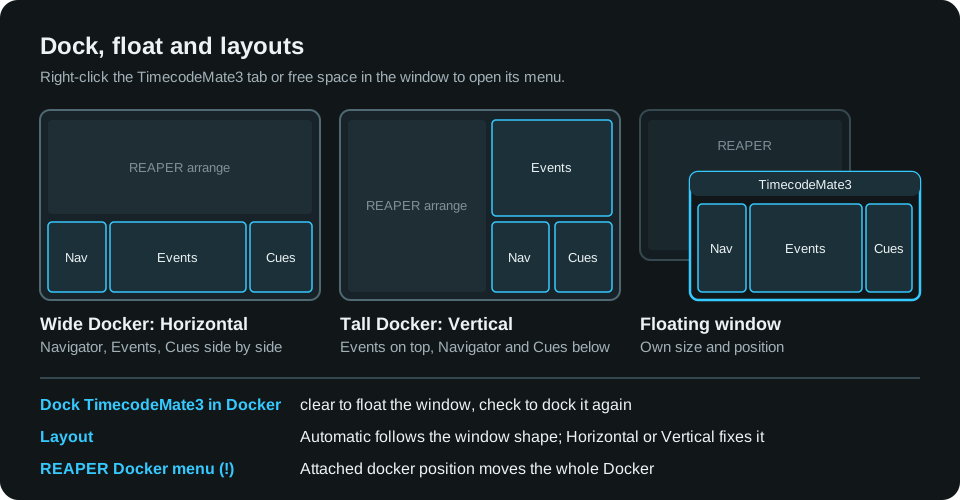
New window layouts; float or dock. Right-click the TimecodeMate3 tab or free window space for the window menu. Clear Dock TimecodeMate3 in Docker to float the window; check it to dock again. Layout is Automatic (follows the window shape), Horizontal or Vertical. Show navigator, Show separate Cue table and Interface scale fit it to small screens.
Q records at the play cursor. Q and Add event use the play cursor while REAPER plays and the edit cursor while it is stopped. Q follows the selected Track's Cue assignment.
Track shortcuts. Defaults on Mac / Windows:
select Track 1-9: Control+1-9 / Ctrl+Shift+1-9;
add an Event directly on Track 1-9: Command+Control+1-9 / Ctrl+Alt+Shift+1-9 (uses that Track's token and Cue settings);
select all Events of the selected Tracks: Control+A / Ctrl+Shift+A.
Navigator and Add event show your actual bindings; change them in REAPER's Action list.
Repeat a section on several Tracks. Copy Events from several Tracks, select the destination Track and Paste: lanes and gaps are kept, also into another Timecode, and Cues resolve in each receiving Track's Sequence.
More reliable grandMA3 Update. A project reopened after an import no longer shows false conflicts. Summary target picks show progress; picking the original target again cancels the change. + MA timecodes accepts ranges such as
1 Thru 5; an unnamed MA Timecode arrives as Timecode X (its pool slot). Unreadable Fade/Delay is skipped for that Cue instead of clearing its timing.
Also new
Gumroad activation on Mac works like Windows: paste the receipt code under Enter your Gumroad code and select Activate code.
Update checks on macOS: Settings, license and updates... > Updates. Download update opens the archive in your browser; install it yourself.
Disable hides a Track's or Timecode's Events from Arrange, the ruler and the Events table. It is local to REAPER; the data still takes part in Update.
Navigator: double-click a name or press F2 to rename; double-click a Track's colour dot to select or deselect its Events. Right-click an Events column heading to choose columns.
Static # gives several Events one Cue; Renumber cues refuses duplicate numbers; a plan that changes nothing says so.
Extensions > TimecodeMate3 has Events and Tracks submenus. The separate forced Event + Cue action is removed. About is now Settings, license and updates.
Fixes
Refused adds, batches and Pastes explain why and change nothing, including selection and Undo. Adding before a Timecode start extends it without moving Events; nothing is created before project zero or in locked/disabled Regions.
Undo of repeated Pastes and Event edits keeps Events and ruler markers intact.
Mac: typed popover values update immediately; Command+A/C/V/X work in our fields, also with a Russian keyboard layout.
Select all no longer toggles off; the colour-dot toggle works on repetition.
Floating geometry, docking and settings survive reopening and screensets. Closing the window stops background activity. Status messages get room before the counts.
Fewer connection timeouts with grandMA3; Mac REAPER stays responsive in the background.
A missing or unreadable MA plug-in folder is reported with its path and reason. Update checks no longer delay docking or closing the window.
Start in five minutes
Install the REAPER extension and the grandMA3 plug-in from the same package and activate (next section).
Open your REAPER project and your grandMA3 show.
In REAPER, right-click the TimecodeMate3 tab and open Settings, license and updates.... Under Server, Run server is on and Status reads
Listening. For a console on another computer, note the address under This machine and the Port.In grandMA3, in the Data Pool of your show, run
Plugin <slot>. Enter the REAPER address if asked.The Summary lists what each side will receive. To bring an existing MA Timecode into REAPER, press + MA timecodes. Make the choices it asks for, then press Update.
Read the report, check the console, save the project and the show.
Install and activate
Requirements: REAPER 7.71 or newer; grandMA3 or onPC 2.4 or newer; REAPER and grandMA3 on one computer or on the same local network.
REAPER extension
Quit REAPER and grandMA3 first.
| Windows | macOS | |
|---|---|---|
| File | reaper_timecodemate3.dll | TimecodeMate3-5.0.1-macos-installer.pkg |
| Do | Copy the DLL directly into C:\Users\<you>\AppData\Roaming\REAPER\UserPlugins. Options > Show REAPER resource path opens the parent folder. | Run the installer. It puts reaper_timecodemate3.dylib into ~/Library/Application Support/REAPER/UserPlugins/ and replaces an older version. |
| If blocked | The package is unsigned. System Settings > Privacy & Security > Open Anyway, then run it again. |
Start REAPER and choose Extensions > TimecodeMate3 > Show UI. If activation is needed, the activation window opens.
Activate
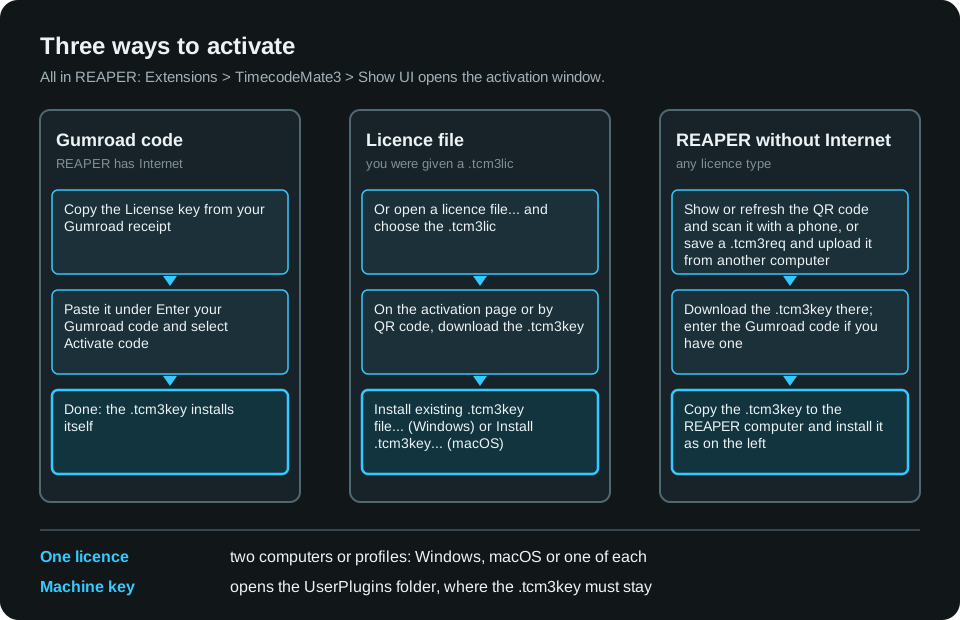
Gumroad code (Internet needed): paste the License key from your receipt under Enter your Gumroad code and select Activate code. The key installs itself. A refused code stays in the field for correction.
Licence file: Or open a licence file..., choose the
.tcm3lic, get the.tcm3keyfrom the activation page or QR code, then Install existing .tcm3key file... (Windows) or Install .tcm3key... (macOS).REAPER without Internet: scan the QR code with a phone and enter the Gumroad code there if you have one, or save a
.tcm3reqand upload it on the activation page from another computer. Bring the.tcm3keyback and install it.
One licence covers two computers or profiles: Windows, macOS or one of each. The key is specific to its computer and stays beside the extension in UserPlugins. Settings, license and updates... > Machine key opens that folder; Machine slot: N of 2 shows the seats. A lost key comes back by repeating the activation for that computer, or from support.
grandMA3 plug-in
Copy the whole
TimecodeMate3-ma3folder into the grandMA3 plug-in library on every console and onPC computer that runs the show. Usual Windows path:C:\ProgramData\MALightingTechnology\gma3_library\datapools\pluginsIn the Data Pool of your show, open a Plugin Pool, pick a free slot and import
TimecodeMate3-ma3.xmlwith the pathTimecodeMate3-ma3.Run it once:
Plugin <slot>.
The show stores only a small loader; the code is read from that folder on every run. To update, copy the new folder to every machine, close any open Summary and reimport into the same slot with overwrite.
Check the version: Settings, license and updates... in REAPER reads Release 5.0.1; grandMA3 System Monitor shows TCM3 TimecodeMate3 plugin loaded (build …) when the plug-in runs.
The window
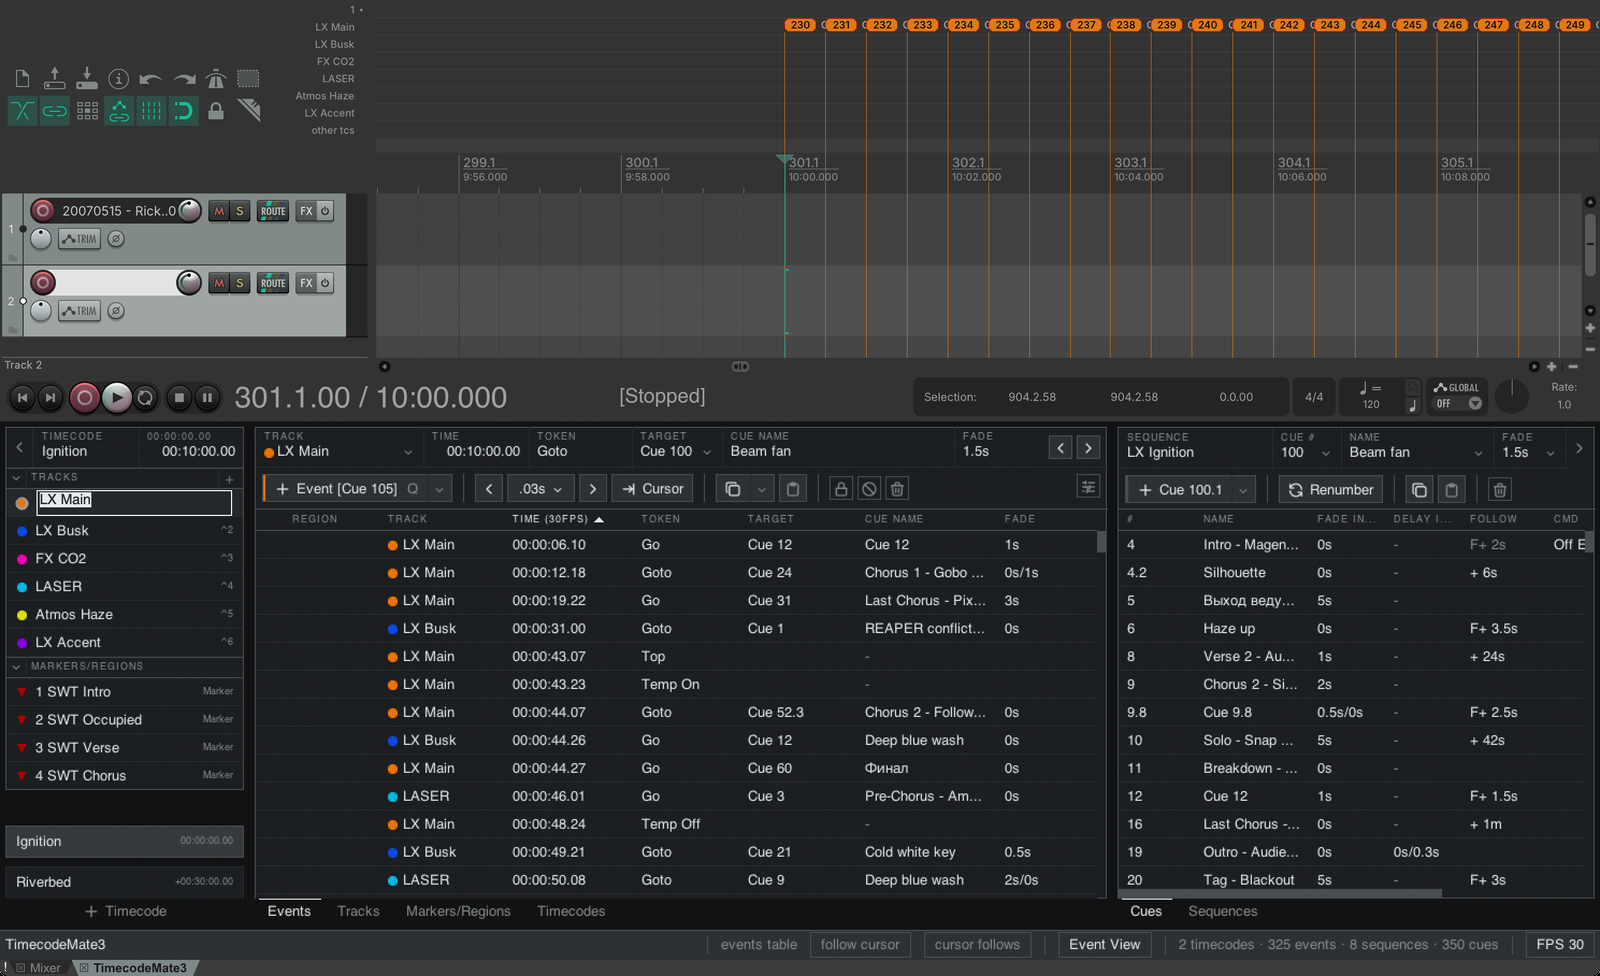
| Area | What it holds |
|---|---|
| Left: Navigator | Timecodes, their Tracks and unassigned markers. Click to select. Double-click a name or press F2 to rename. Double-click a Track's colour dot to select all its Events. |
| Top: ribbon | The selected Track and Event: Time, Token, Target, Cue name, Fade, and Add with its Q shortcut. |
| Centre: tables | Events, Tracks, Markers/Regions, Timecodes. |
| Right: Cues and Sequences | The Cue list of the selected Sequence. |
| Bottom: status bar | Messages and counts, Event View, follow cursor and cursor follows, and the product name, which opens Settings. |
Dock, float and layout
Right-click the TimecodeMate3 tab, or free space in the window, for the window menu:
| Menu item | Effect |
|---|---|
| Dock TimecodeMate3 in Docker | Checked: docked. Clear it to float the window; size and position are remembered. |
| Layout | Automatic follows the window shape: tall is Vertical, wide is Horizontal. Horizontal or Vertical fixes it. Drag the dividers; they are remembered. |
| Show navigator, Show separate Cue table, Show status bar | Hide or show the panes. Hidden Cues and Sequences become centre tabs; with both side panes hidden the tables fill the window. |
| Interface scale | Larger or smaller UI. |
| Events table follows cursor, Cursor follows Events table | Link the table selection and the REAPER cursor. |
| Event view settings..., Project frame rate: ... | Lane display options; the frame rate used for time display. |
| Settings, license and updates... | See below. |
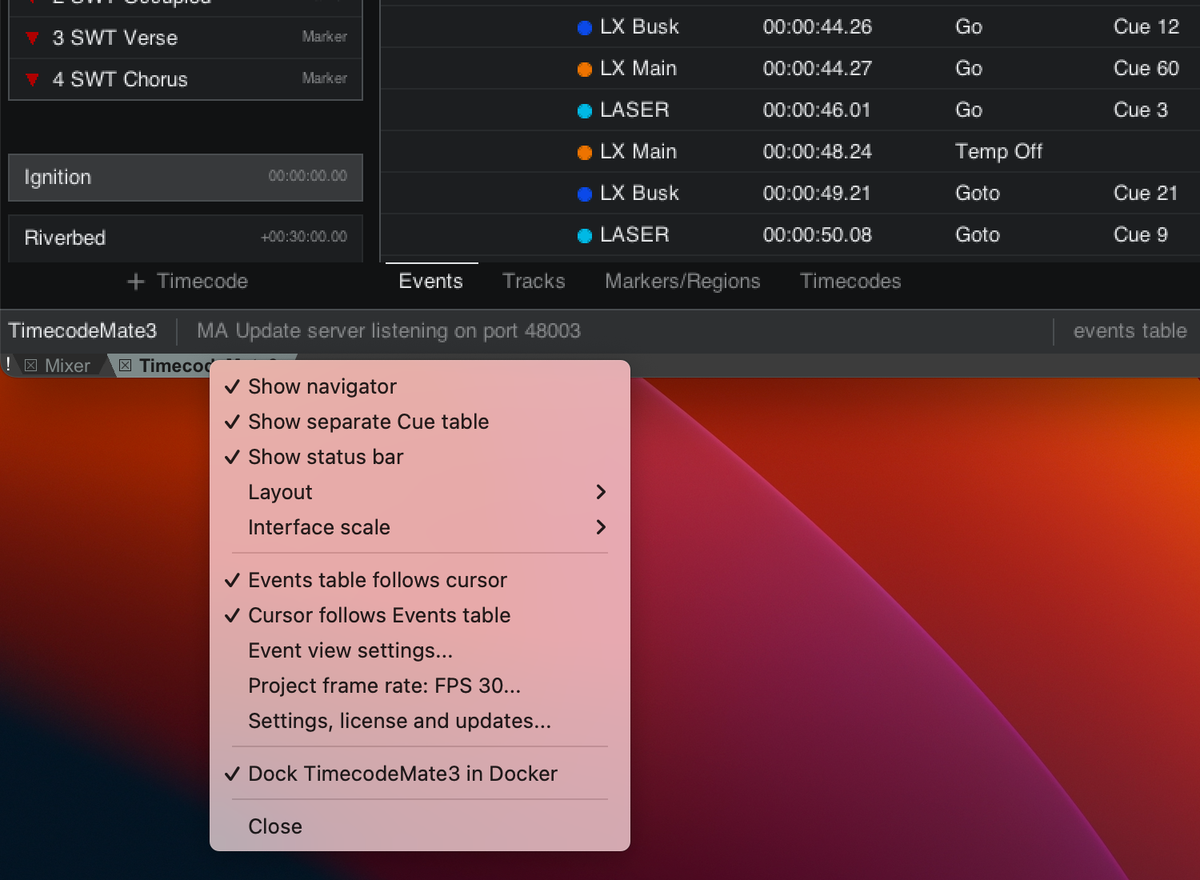
To move the whole Docker with every tab in it, use REAPER's own Docker menu, the small ! beside the tabs: Attached docker position: left, right, top or bottom. Drag our tab alone to another Docker or to a screen edge. On a small screen, use a left or right Docker with Automatic layout.
Lost the layout? Run TCM3: Reset UI layout (columns, panes, scale) from REAPER's Actions. Lost the window? Extensions > TimecodeMate3 > Show UI.
Settings, license and updates
Opens from the window menu or from the product name in the status bar.
Release, Licensed to, Machine slot: N of 2 and Machine key, which opens the folder holding your
.tcm3key.Updates: Check now, Check for updates automatically, Update status. Download update opens the release archive in your browser; install it yourself. Mac 4.3.0 has no update check: get 5.0.1 from Gumroad or your download link.
Server: Run server, Port with Apply, Status, and the IPv4 addresses under This machine for a networked console.
MA peer sync state with View peers, and Interface scale.
Keyboard shortcuts
| Action | macOS | Windows |
|---|---|---|
| Create event at cursor | Q | Q |
| Create event on Track 1-9 at cursor | Command+Control+1…9 | Ctrl+Alt+Shift+1…9 |
| Select Track 1-9 of the active Timecode | Control+1…9 | Ctrl+Shift+1…9 |
| Select all events of the selected tracks | Control+A | Ctrl+Shift+A |
REAPER's Actions > Show action list owns these bindings; change them there, and Navigator and Add show what is assigned. On Mac, Control is the Control key, not Command. Create actions use the play position while REAPER plays and the edit cursor while it is stopped, with the Track's own token and cue setting. If an Event cannot be added (no such Track, locked or disabled, position occupied), nothing changes and the status bar says why.
Show model
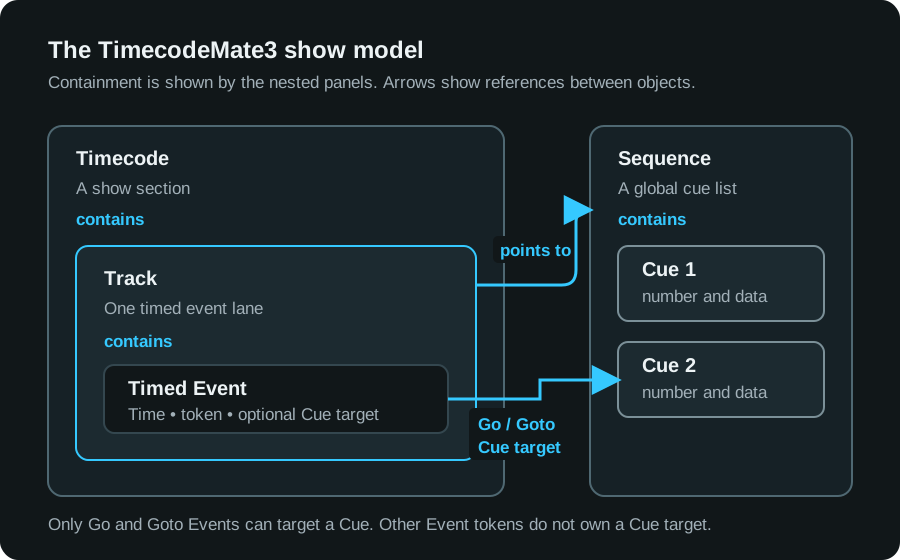
| Object | Meaning |
|---|---|
| Timecode | A song, scene or act: a section of the REAPER project with Start and End. |
| Track | An event lane inside a Timecode, usually tied to one Sequence. |
| Sequence | A global cue list; several Tracks can share one. |
| Cue | Number, name, fades, delays, follow, command, notes. |
| Event | A timed command (Go, Goto, Top...) on a Track, optionally aimed at a Cue. |
| Marker/Region | An ordinary REAPER object; it can belong to a Timecode. |
TimecodeMate3 data lives in the REAPER project, MA data in the show; Update pairs the objects and exchanges changes. Time is stored in seconds and the frame rate only changes the display. Event Columns > Display absolute time switches between project time and time from the Timecode start.
In tables: click selects, Ctrl/Cmd-click adds, Shift-click selects a range, double-click edits; Enter commits, Escape cancels, Tab moves on.
Edit in REAPER
Timecode and Tracks
A new project already has one Timecode, Track and Sequence. Rename them or add your own:
In Timecodes or the Navigator, add a Timecode and set Start and End wide enough for all its Events.
Select it, open Tracks, Add track; set name, colour, Sequence and Default Token.
Allmakes the Track available everywhere.New cue # decides what a new Event gets:
None(no Cue), the next or an inserted cue number, or Static number.
Cues
Select a Sequence in Cues, Add Cue, then edit number, name, Fade In/Out, Delay In/Out, follow, command and notes. Numbers can be decimal (1.5). Renumber gives a selected range new numbers; it refuses duplicates and never merges Cues.
Events
Select the Track.
Put the edit cursor on the time, or start playback.
Press Q or Add. During playback the Event lands at the play position; stopped, at the edit cursor.
Check Token and Target.
GoandGotocan aim at a Cue; an empty Target follows the Sequence order and shows as(Cue 3).
Record while listening: start playback and press Q at each moment, or Command+Control+N / Ctrl+Alt+Shift+N to drop the Event straight on Track N. Keep the focus out of text fields. Stop, check the rows, then Update.
A regular series: Add Events > Add multiple events, set Amount and Step (0.5s, 250ms, 2m; prev→cur repeats the last gap), check the preview, Apply. Occupied positions are skipped; one Undo removes the batch.
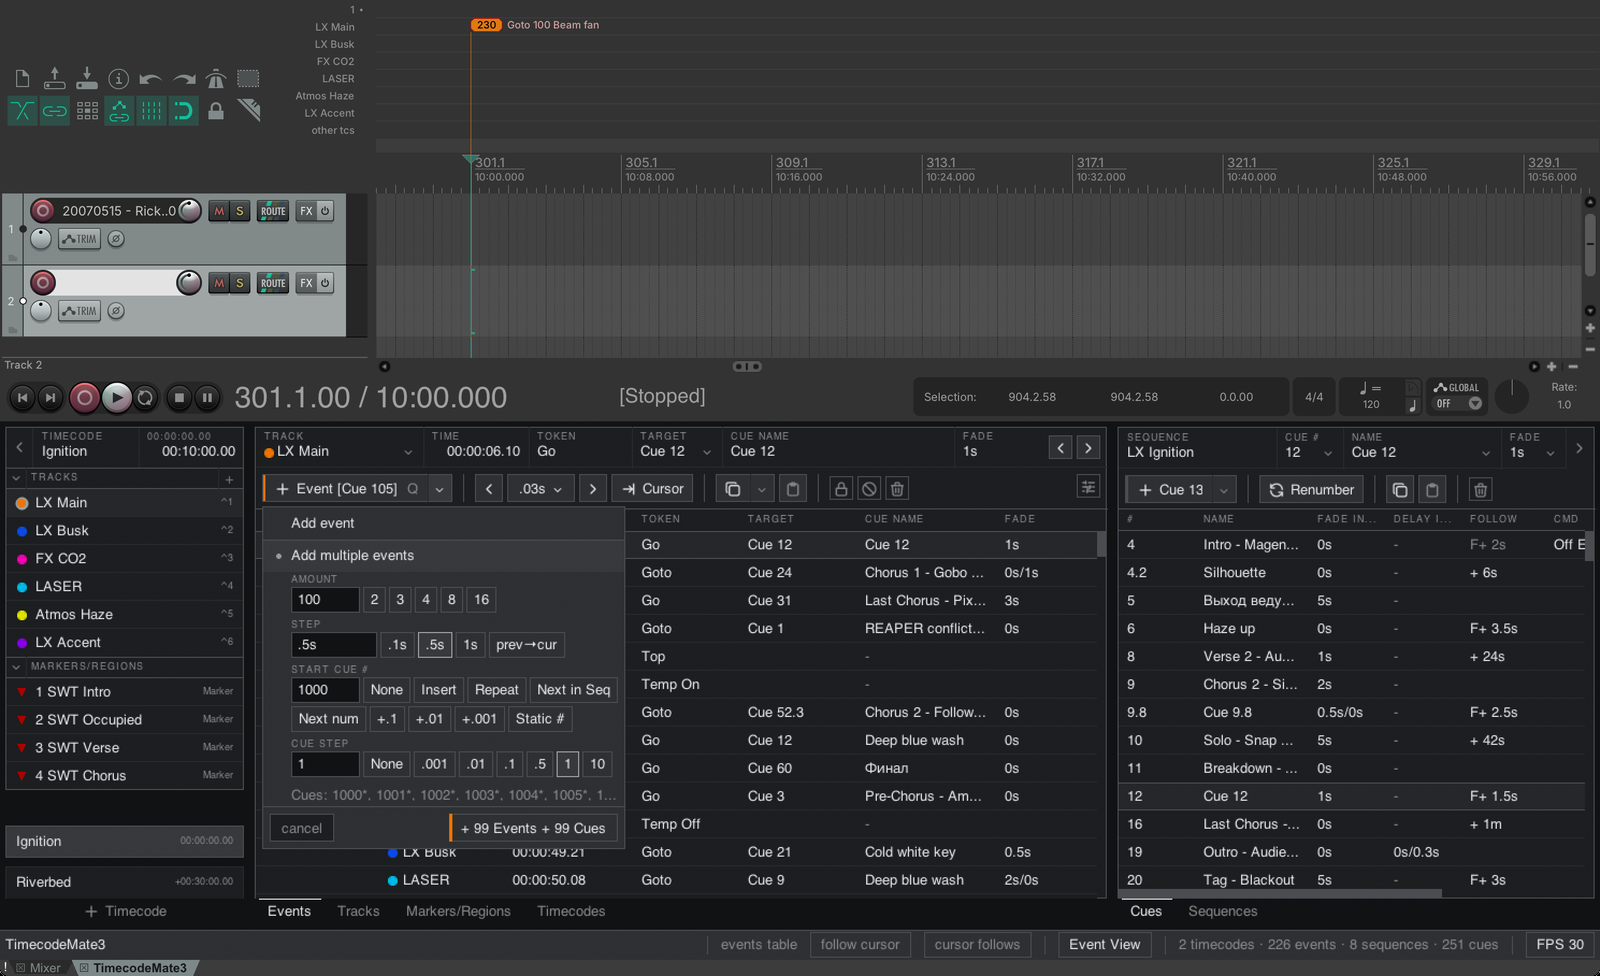
Copy and Paste: select Events of one Timecode, Copy, select the destination Track, place the cursor, Paste. Relative timing is kept; the Copy mode anchors at the first Event or at the cursor. Events from several Tracks keep their lanes: the active Track's lane lands on the selected Track and the others the same number of Tracks above or below, also in another Timecode. Paste never creates Tracks or Sequences, and does nothing when the lanes do not fit or a target is locked or disabled. One Undo removes the paste.
Several Events to Cues: select them and open Target: Assign/create cues (start number and step, or Static # to give all of them one Cue), Renumber cues (refuses duplicates), Reassign cues in timeline order. The preview says when a plan changes nothing.
The ribbon also nudges Events, moves them to the cursor or to another Track, locks, disables and deletes them. Fade uses the Cue timing or an override. Right-click the table header for optional columns: Duration, Region, Cue Delay, Cue Follow, Cue Command, Cue Notes.
Markers and Regions
Add marker and Add region create ordinary REAPER objects; manage them in Markers/Regions (filters markers and regions; Select Events Only selects a Region's Events). Event markers on the ruler are editable: moving or deleting one edits the Event, unless the Event, its Track or its Timecode is locked or disabled, in which case the marker comes back.
Two ways to turn existing markers, for example from a Cubase SWT export, into Events:
events at markers (Markers/Regions ribbon): select one Track and the markers. Each marker gets an Event with the Track's token and cue setting; occupied positions are skipped; one Undo removes the batch.
Accept markers as Events (Event View settings): new markers become Events as they appear. The marker name is read like this:
| Part of the marker name | Becomes |
|---|---|
Leading number, 5 | Cue number (otherwise the marker's own number) |
The rest, Chorus | Cue name |
{Lights} | Track (otherwise the selected Track) |
[text] | Cue command |
Trailing 2/0.5 | Fade 2 s, delay 0.5 s |
5 Chorus {Lights} 2/0.5 becomes an Event on Lights aimed at Cue 5 "Chorus". Events keep their time in seconds and do not follow later tempo changes.
Lock blocks edits. Disable also hides a Track's or Timecode's Events from Arrange, the ruler and the table; they still take part in Update. Both are in the ribbon and in the State column.
Update with grandMA3
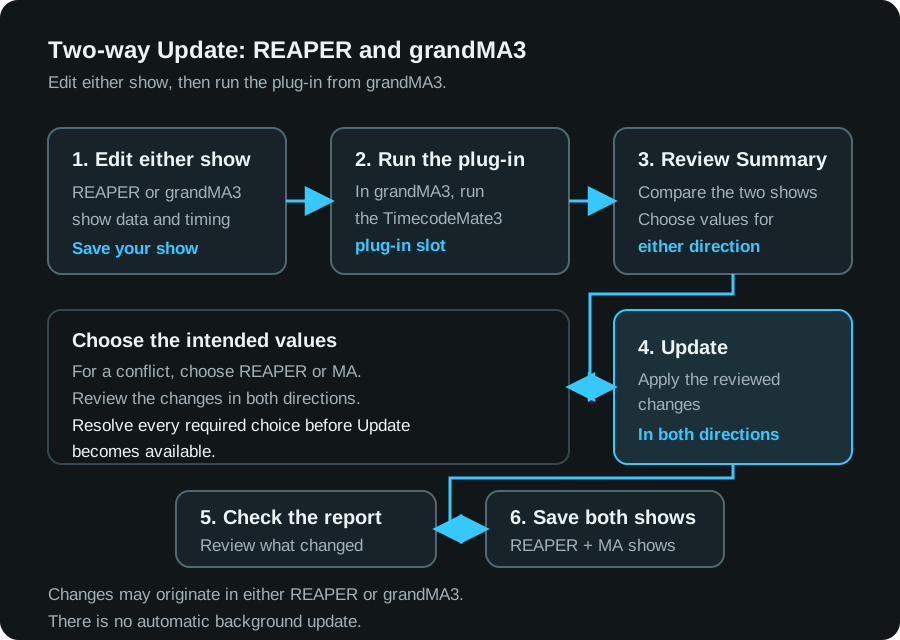
Update is two-way: edits made in REAPER go to grandMA3 and edits made in grandMA3 come back, in one run. It always starts from the plug-in on the console, and nothing is written before you press Update.
Connect and review
REAPER can stay offline from the Internet after activation. Update works over Ethernet, Wi-Fi, or a mixed local network: for example, a computer on Wi-Fi and a console connected by cable to the same router or access point.
Use any configured external Ethernet port on the console (Con1, Con2, or Con3, where available) that can reach the REAPER computer. Set its IPv4 address and subnet mask in Menu > Network > My Interfaces. In onPC, configure the network adapter in the operating system.
For a simple setup, use different addresses in the same subnet, for example REAPER 192.168.1.10, console 192.168.1.20, both with mask 255.255.255.0. Allow the REAPER server TCP port (default 48003) through the computer firewall, and disable Wi-Fi client isolation if it blocks communication between the devices.
Save a backup of the project and the show.
In REAPER, Settings, license and updates > Server: Run server on, Status
Listening.In grandMA3, select the Data Pool and run
Plugin <slot>. If REAPER endpoint opens, enter the REAPER computer's IP address (127.0.0.1on one computer) and the port (default48003), then Connect.
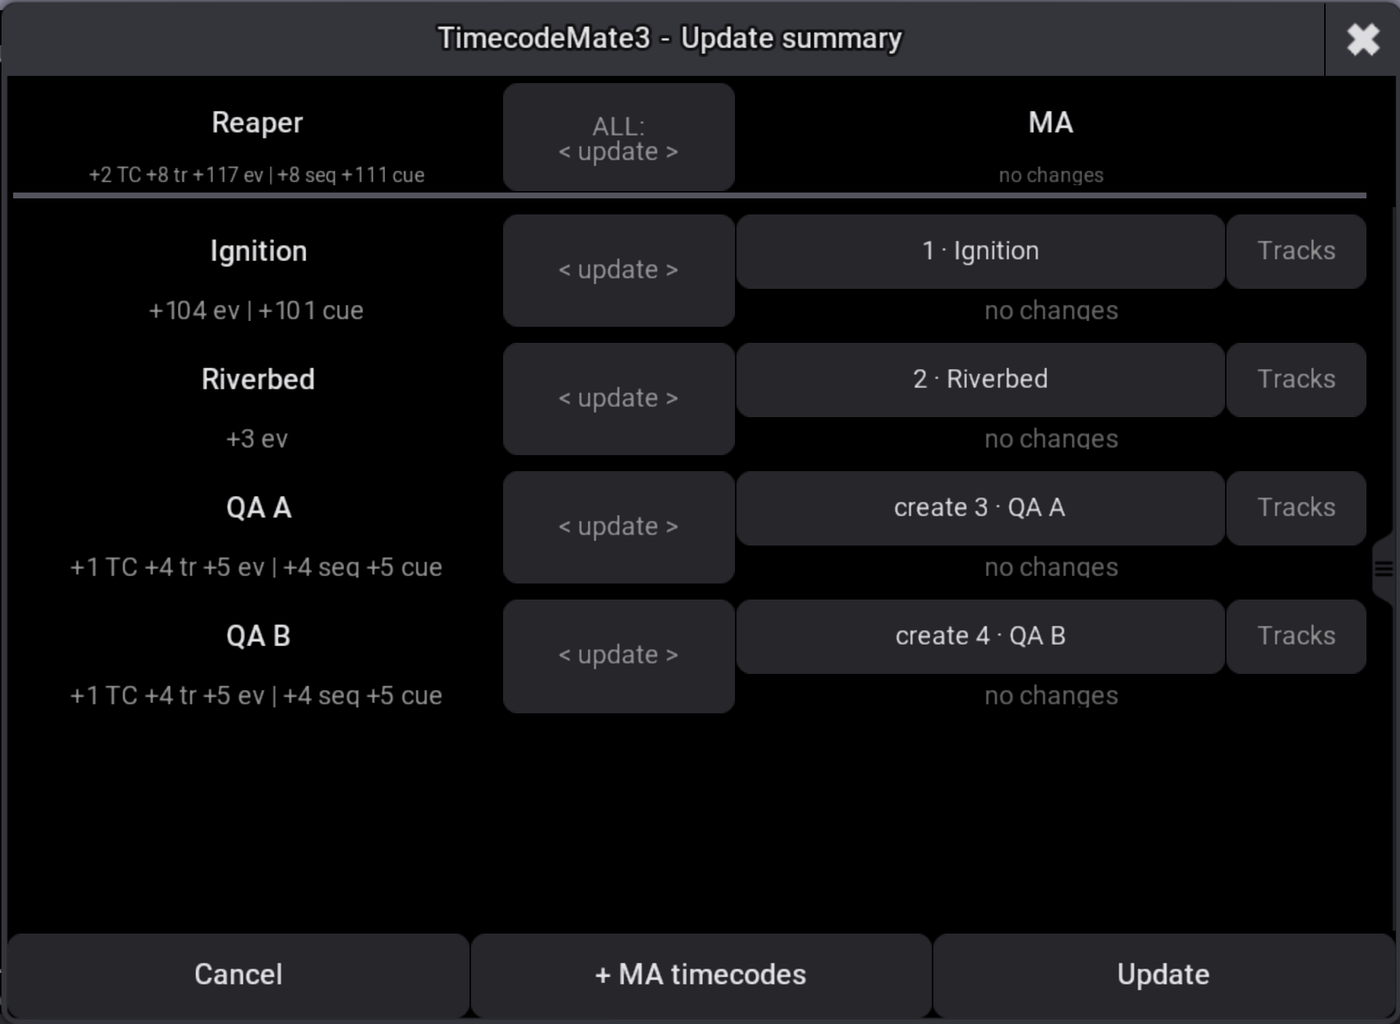
The Summary shows what each side will receive. It may ask you to pick a target or pool slot for a new Timecode or Sequence, to choose REAPER or MA for a conflict, or to set do not sync for a Timecode that should stay untouched. Update becomes available once every choice is made; Cancel changes nothing. Read the report afterwards. If the connection dropped, reconnecting finishes the same run.
Bring an MA Timecode into REAPER
Open the REAPER project that should receive it, with the server listening.
Run the plug-in in the Data Pool that holds the Timecode.
In the Summary press + MA timecodes, enter
3,1 Thru 5or2 + 7, then Continue.Review: the new Timecode shows create new; an unnamed MA Timecode arrives as Timecode X, X being its pool slot. Tracks, Events, Sequences and Cues come with it.
Update, check the result in REAPER, save both sides.
The same import from the command line: Plugin 1 "add-from-ma 3" (plug-in slot 1, Timecode 3). After the first import use normal Update; do not import the same Timecode again.
Send a REAPER Timecode to grandMA3
Build it in REAPER, run the plug-in, choose the MA targets or pool slots the Summary asks for (check an existing target before binding to it), Update. From then on both sides can edit it.
Keep editing on both sides
Edit in REAPER, in grandMA3 or in both, then Update. A change made on one side is carried to the other. The same value changed differently on both sides is a conflict: the Summary asks which to keep, and View conflicts lists them. The direction control, per Timecode or for ALL:
| Choice | Result |
|---|---|
< update > | Exchange changes both ways. |
< update > conflicts: Reaper or conflicts: MA | Both ways; conflicts take that side's value. |
Reaper > or < MA | That side is the source for every differing value, not only conflicts. |
do not sync | Leave this Timecode out of this run. |
Deletions are conservative: deleting a synced Timecode or Sequence in REAPER leaves it in MA; deleting a synced Timecode in MA leaves it in REAPER with its sync paused. Event and Cue deletions do travel. Reset sync state only rebuilds damaged pairing; it is not a way to settle a Summary difference.
Troubleshooting
| Problem | Do this |
|---|---|
| TimecodeMate3 is missing from REAPER's Extensions menu | REAPER 7.71 or newer. Windows: the DLL sits directly in UserPlugins (Options > Show REAPER resource path). macOS: run the installer again and pass Open Anyway. Restart REAPER. |
| The activation window keeps appearing | Gumroad: paste the receipt code and Activate code. Have a .tcm3key? Install existing .tcm3key file... or Install .tcm3key.... Use Or open a licence file... only with a real .tcm3lic. No free slot: write to support. |
| grandMA3 cannot import or run the plug-in | The whole TimecodeMate3-ma3 folder must be in the plug-in library of that machine. Import the XML with the path TimecodeMate3-ma3 into a slot of the right Data Pool. System Monitor names what was loaded. |
| REAPER endpoint will not connect | Turn on Run server; Status must read Listening. If it does not, check the reported error. If the port is taken, set another Port, Apply, and use it on the console. Same local network, firewall open, no 127.0.0.1 across computers. timeout once: retry; twice: send the run log to support. macOS 15 or newer: Privacy & Security > Local Network must allow REAPER. |
| Update is greyed out in the Summary | A row still needs a choice: a value, an MA object or a pool slot. |
| A Cue arrived but no Event on the timeline | A Cue is a list entry without a time. Check the MA Timecode's Track and Events. |
| Update reports unreadable timing | That Cue's Fade or Delay is skipped, not cleared. Send the Cue name and tcm3_runs.log to support. |
| An Event marker jumps back after I move or delete it | Its Event, Track or Timecode is locked or disabled. Unlock or enable it and repeat. |
| The layout looks wrong after a resize | TCM3: Reset UI layout (columns, panes, scale) in REAPER's Actions. |
Support: support@vldurnov.com with your OS, REAPER and grandMA3 versions, the steps, the exact message and a screenshot of the Summary or System Monitor. Buy at plugins.vldurnov.com/l/TimecodeMate3.
Command reference
REAPER actions
All under Extensions > TimecodeMate3, with Events and Tracks submenus, and in the Action list as TCM3: ...:
| Action | Use |
|---|---|
TCM3: Show UI | Show or hide the window. |
TCM3: Create event at cursor | Add an Event on the selected Track (default Q). |
TCM3: Create event on Track N at cursor (N = 1-9) | Add an Event directly on Track N of the active Timecode. |
TCM3: Select Track N of the active Timecode (N = 1-9) | Select Track N. |
TCM3: Select all events of the selected tracks | Select their Events. |
TCM3: Delete selected events | Delete the selected Events. |
TCM3: Convert TimecodeMate 2 markers to Events | Migration aid; back up first. |
TCM3: Reset UI layout (columns, panes, scale) | Restore the default layout. |
grandMA3 plug-in commands
Plugin <slot>                           Update
Plugin <slot> "add-from-ma 1 Thru 5"    Update with these MA Timecodes added
Plugin <slot> "reset"                   Reset sync state